
Your Guide to Mastering Color Management
In the modern world of filmmaking and digital media, Color Correction and Color Grading are no longer just artistic choices; they have evolved into precise technical sciences. As a video editor or colorist, you have likely faced this nightmare: you spend hours meticulously tweaking the colors of your video inside DaVinci Resolve or Adobe Premiere until it looks absolutely flawless. However, the moment you export the file and watch it on your smartphone or upload it to YouTube, you are shocked to find that the colors look washed out, or the contrast and saturation have completely shifted!
The only scientific solution to this issue—and the ultimate secret that separates amateurs from industry professionals—lies in mastering two concepts that changed the face of content creation: Color Spaces and Color Management.
In this advanced guide from the platform AskMonther, within our category "Technical Terms and Basic Concepts", we will break down these technical codes in detail, and then dive into the depths of the most famous global systems such as ACES and DaVinci Wide Gamut (DWG).
First: What is a Color Space?
Simply put, a Color Space is like a "box of crayons" or the defined range of colors and shades that a camera can capture, or a editing program can process, or a screen and cinema projector can display.
While the human eye can perceive millions of vibrant colors, current display technology cannot yet replicate the entire human visual spectrum. Therefore, the industry relies on standardized "Color Spaces" to dictate exactly which shades of Red, Green, and Blue (RGB) can be generated.
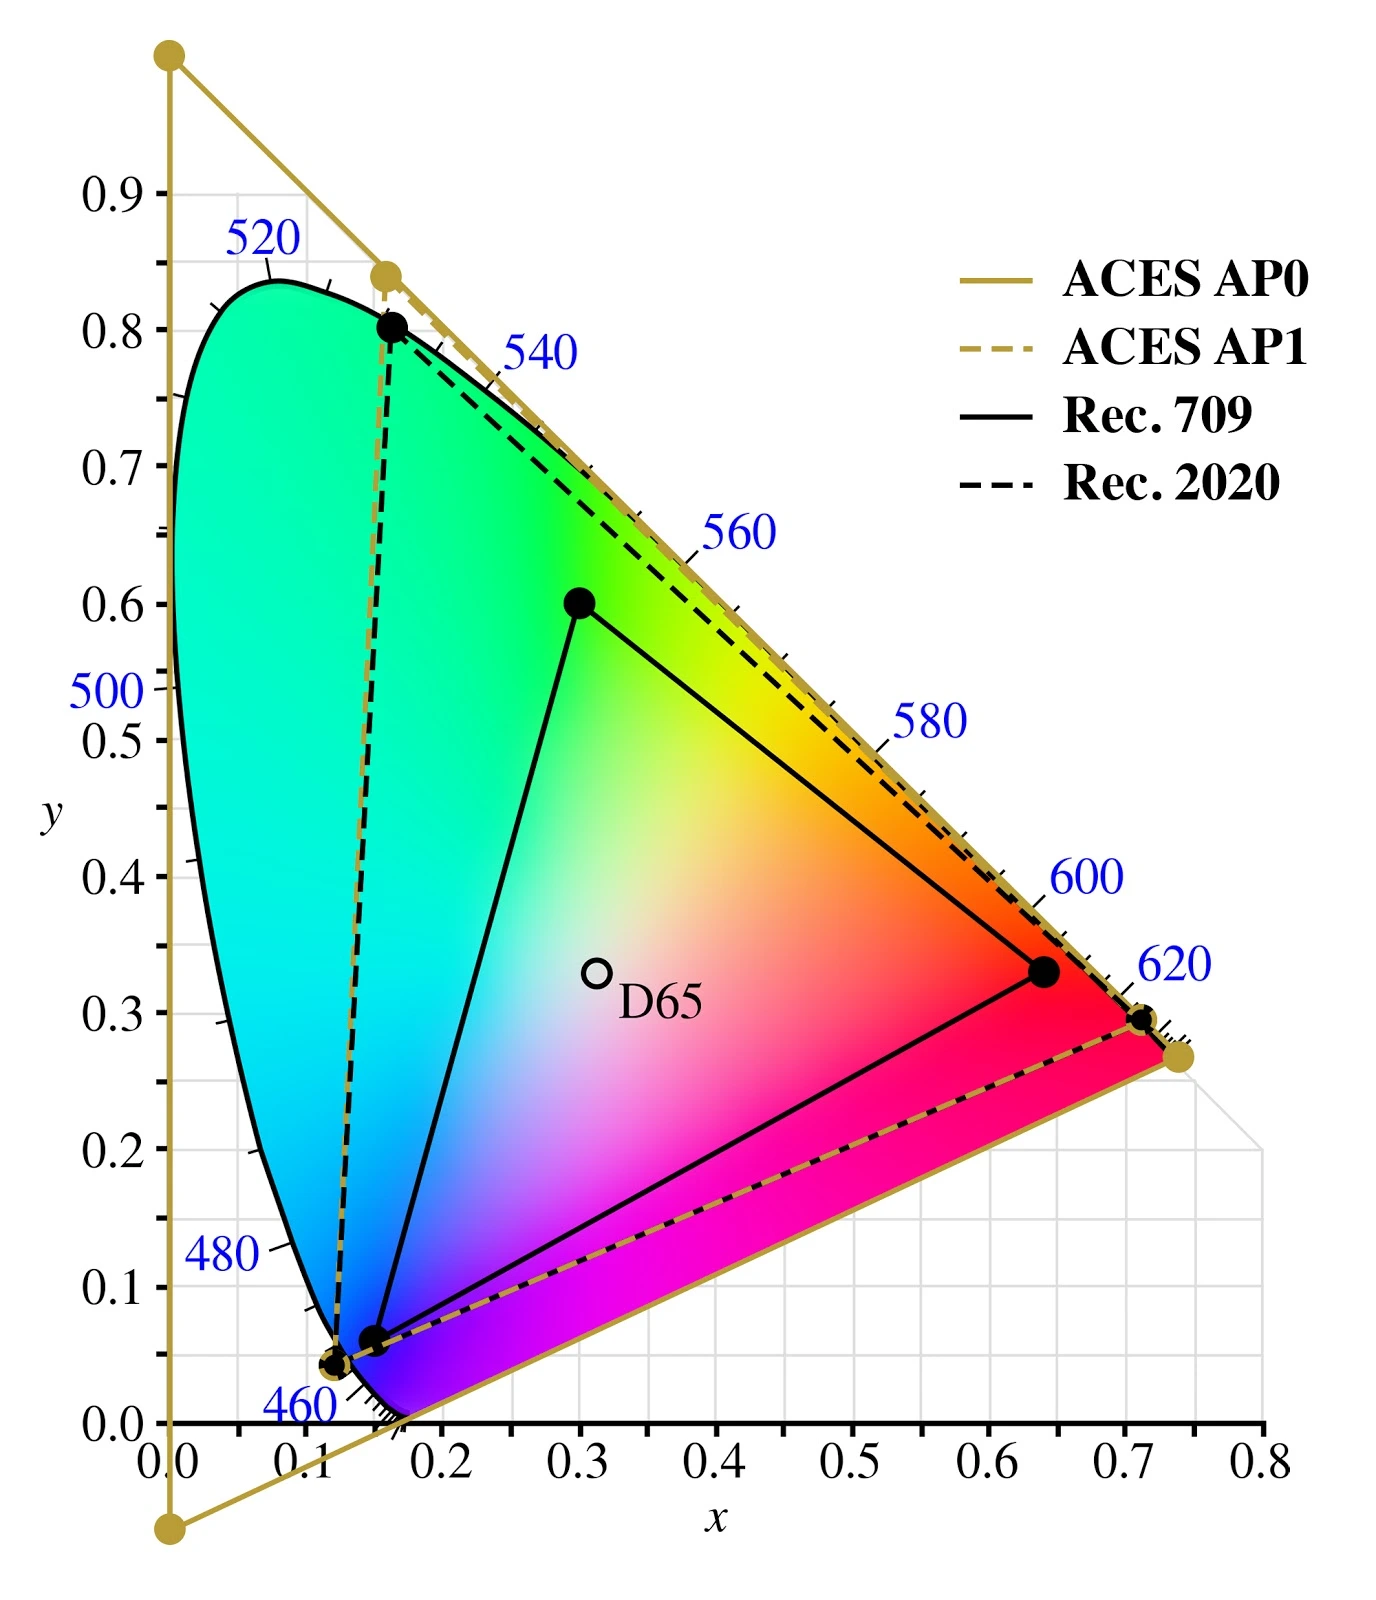
These spaces are measured and displayed globally based on a geometric standard called the CIE 1931 Chromaticity Diagram (commonly known as the tongue-shaped color chart). It represents the full visual spectrum of the human eye, within which various color spaces are mapped out as overlapping triangles of different sizes.
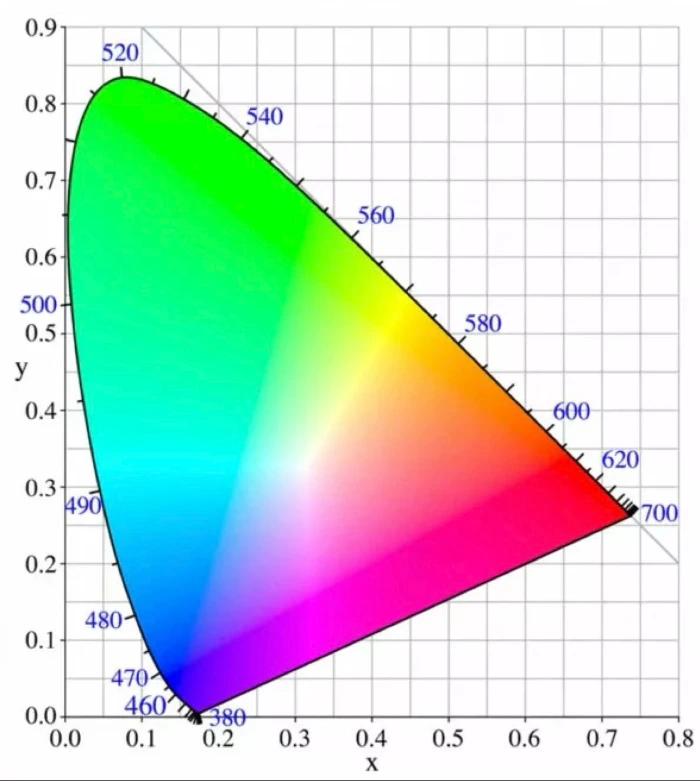
The Four Most Common Color Spaces in Video and Cinema:
Throughout your post-production workflow, you will constantly encounter these four essential color spaces:
Rec.709 (The Standard Display Space): The most widely used color space in the world today. Originally designed for HDTVs, it has a relatively narrow color spectrum (representing the smallest triangle in the CIE 1931 chart). Despite its technical limitations, it remains the universal standard for internet delivery, YouTube, social media, and most commercial consumer monitors.
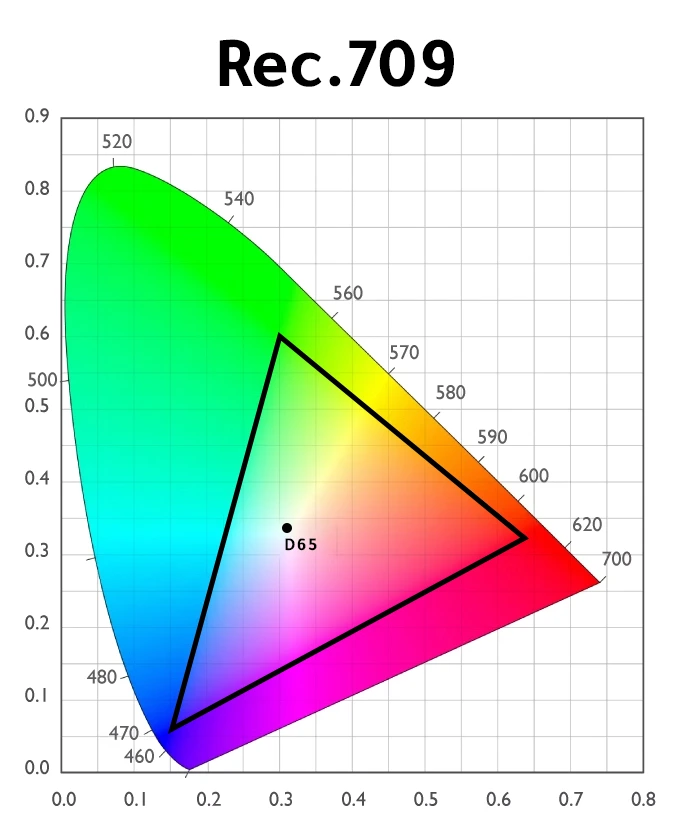
It is mentioned for clarification that the point called D65 is the point that indicates the location of pure white in color spaces.
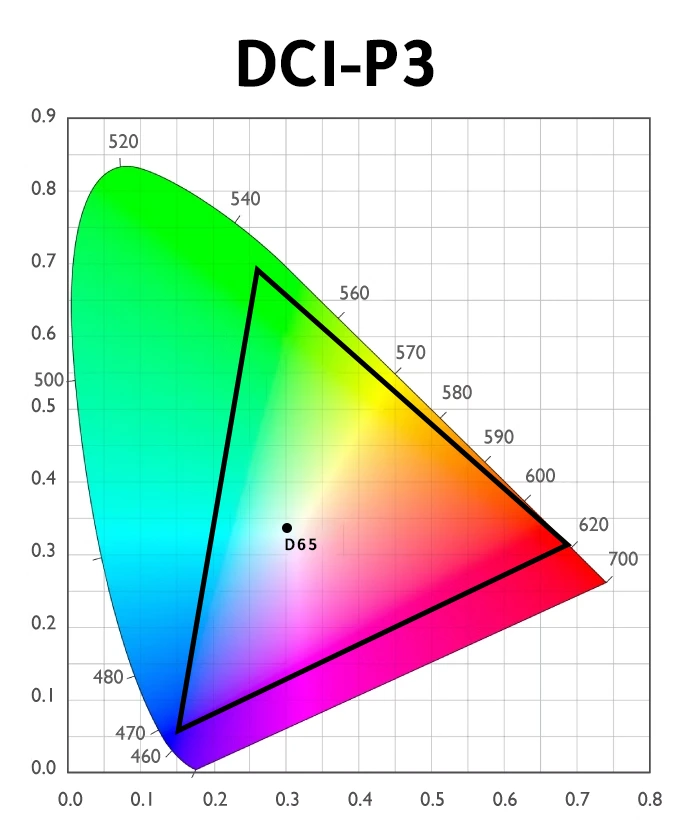
DCI-P3 (The Cinema Standard): A significantly wider color space than Rec.709, capable of displaying much richer, deeper, and more saturated tones (especially within greens and reds). This is the mandatory standard for digital cinema projection and is now natively supported by modern Apple devices (iPhones, MacBooks) and high-end consumer TVs.
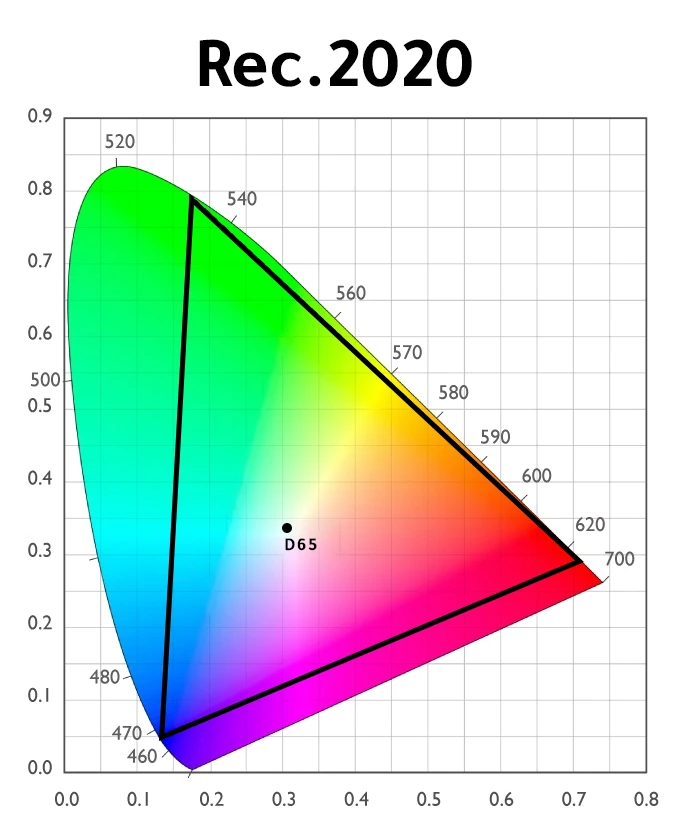
Rec.2020 (The Future of HDR): An incredibly massive color space (representing the largest triangle in the CIE 1931 chart) engineered specifically for Ultra-HD (4K and 8K) and High Dynamic Range (HDR) workflows. It encompasses highly saturated, lifelike colors, mapping out the future standard for visual media.
Log Color Spaces (Camera Profiles): Such as Sony's S-Gamut3 or REDWideGamut. These are massive, proprietary color spaces used strictly for shooting. They allow camera sensors to capture the maximum available color data and dynamic range, resulting in a flat, grayish image that requires professional grading in post.
As for the Log spaces for professional cameras (like S-Gamut from Sony or RED Wide Gamut), they do not usually appear in a single fixed diagram because each camera company has its own Log space, but theoretically, the large Log spaces extend in this visual diagram to occupy a very large area approaching the limits of the Rec. 2020 or exceed it, so that the camera can capture as much raw data as possible before converting it later during Color Management.
How Color Spaces Directly Impact Your Workflow:
Dictating Creative Flexibility: If you capture or grade your footage inside a narrow space like Rec.709, your image will quickly break down, introducing ugly compression artifacts and noise when you try to manipulate contrast or saturation. Working within a wider color space gives you ultimate flexibility to push your colors further without quality degradation.
Ensuring Accurate Deliverables: Understanding color spaces allows you to master your video correctly based on its final destination. A project meant for movie theaters must be graded and exported in DCI-P3, while content built for web streaming requires a Rec.709 target. Misunderstanding this process is the exact reason why colors unpredictably turn washed out or overly saturated upon export.
Secondly: What is Color Management? And Why is it Mandatory?
Put simply, Color Management acts as an "intelligent translator." It ensures that your video's colors remain consistent and accurate through every single stage of production: from the moment the camera sensor captures the light, through the editing monitor, and finally onto the viewer’s screen.

Traditionally, editing software operated on a "Display-Referred Workflow." This primitive system forced the software to display colors based solely on the capabilities of the specific monitor you were using at that moment. If your screen wasn't perfectly calibrated, you would grade based on an optical illusion, causing your work to look drastically distorted on any other display.
In contrast, modern workflows rely on a "Scene-Referenced Workflow"—or Color Management. Here, the software cleanly separates three distinct spaces: the color profile captured by the camera (Input Space), the massive, unified color space where the actual grading takes place (Timeline Working Space), and the specific color standard of the screen your audience will use to watch the video (Output Space).
Why must you use it in every project?
Eliminates Post-Export Shifts: Color Management guarantees that what you see on your timeline in DaVinci Resolve or Premiere is exactly what your audience will see on their phones or YouTube.
Instantly Blends Multiple Cameras: If your timeline contains footage from different cameras (such as Sony, RED, and iPhone), Color Management unifies their varying color characteristics with a single click, making them look as though they were shot on the exact same camera system.
Preserves Image Integrity (Dynamic Range): By managing your colors, the software retains all the micro-details in the highlights and shadows captured by the camera sensor, allowing you to push your creative grade further without breaking or degrading the video quality.
Third: ACES: The Universal Color Management Standard
When discussing Hollywood-level professional color management, ACES dominates the industry. ACES stands for the Academy Color Encoding System, developed by the Academy of Motion Picture Arts and Sciences (the organization behind the Oscars). It was designed to serve as a universal, global color language across all post-production houses worldwide.
ACES utilizes a massive virtual color space that encompasses every color the human eye can see, and more. Technologically, it is divided into two primary gamuts that every editor must understand:
ACES AP0 (The Archival Gamut): This is the largest color space in the system, defining the primary anchors of ACES. It was designed to encompass the entire human visual locus (everything the human eye can perceive). No monitor in existence today can display the full AP0 gamut, which is why it is used strictly for storing, exchanging, and archiving the final masters of films to guarantee long-term, unaltered quality for future display technologies.
ACES AP1 (The Working/Grading Gamut): A slightly smaller gamut than AP0, but still vastly larger than traditional display standards like Rec.709. The color primaries of AP1 were adjusted specifically for color grading and VFX software. It ensures that grading tools like wheels and curves respond naturally and logically, mimicking the behavior of real-world light. This is the working space you select inside your software (commonly known as ACEScc or ACEScct) to perform your actual color grading.
Fourth: ACES vs. DaVinci Resolve Wide Gamut (DWG)
With the massive evolution of DaVinci Resolve, Blackmagic Design introduced its own native color management space: DaVinci Wide Gamut (DWG). To understand the technical differences and choose the best path for your workflow, let us compare them across four essential pillars:
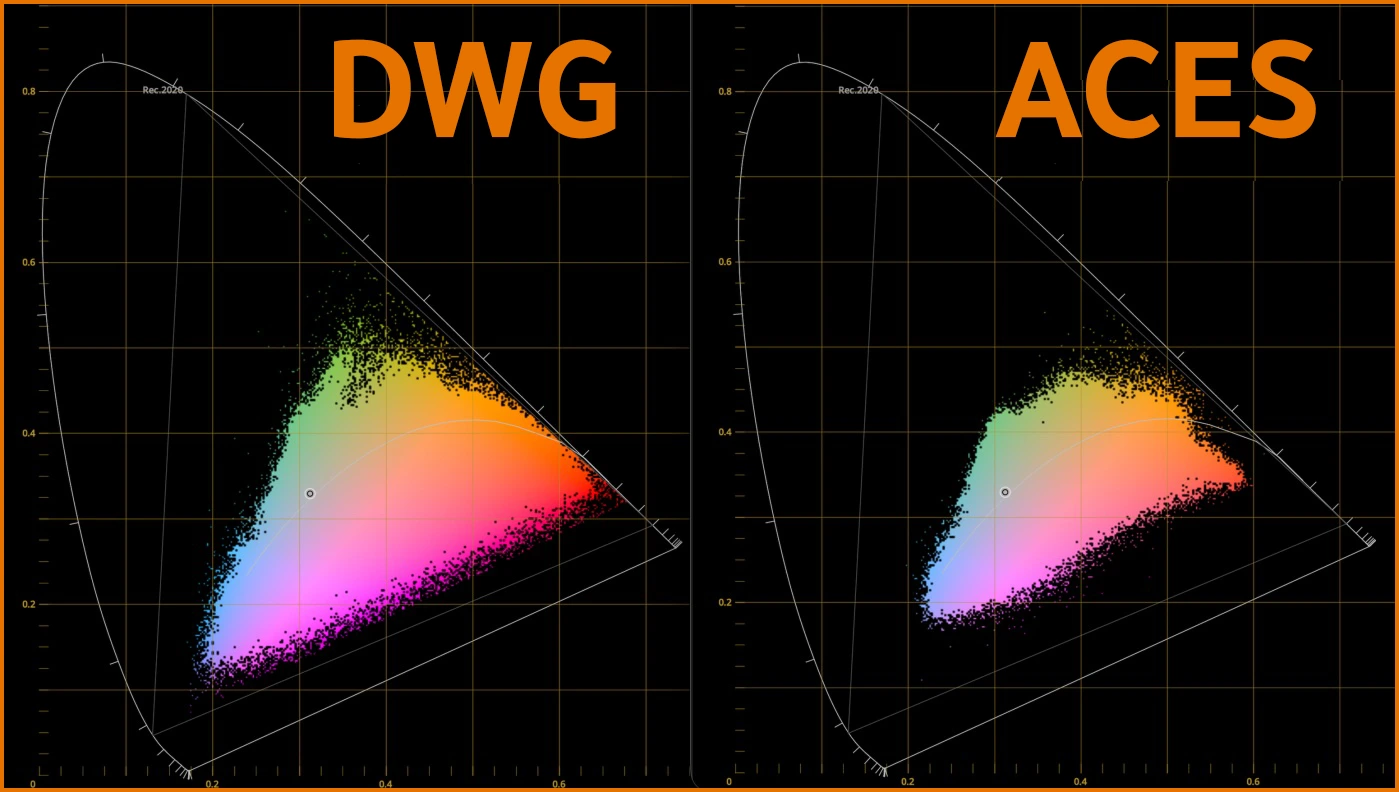
Developer and Cross-Platform Compatibility: ACES is an open, universal, and independent standard built to work seamlessly across almost all post-production software (including Premiere, Resolve, Nuke, and Maya), making it the ultimate choice for large-scale studios and collaborative pipelines. On the flip side, DWG is a native, proprietary color space developed by Blackmagic Design. It is built strictly for DaVinci Resolve, meaning it is mathematically optimized to squeeze the absolute best performance and efficiency out of Resolve's internal tools.
Gamut Size: ACES features a universally massive, almost infinite color space (especially AP0, which covers the entire visible human spectrum). DWG is also an extremely large color space—vastly larger than the standard Rec.2020—but technically slightly smaller than ACES AP0. It is perfectly engineered to house and exceed the maximum data that any modern high-end camera sensor can capture.
Color Characteristics and Controls: ACES is designed to deliver a strict, highly accurate, and mathematically standardized cinematic film look out of the box, which can sometimes feel a bit rigid or technical for beginners to manipulate. DWG, however, tends to deliver vibrant, organic, and malleable colors. It offers colorists smoother flexibility over highlight roll-offs and integrates with flawless precision with Resolve's advanced HDR Palette.
The Right Workflow for Your Project: ACES is the ideal and safest option for large-scale cinema productions involving multiple camera brands and heavy VFX work split across different software and studios. DWG is the faster, more practical, and incredibly powerful option for independent filmmakers, commercial editors, and YouTube creators whose entire post-production pipeline stays 100% inside DaVinci Resolve.
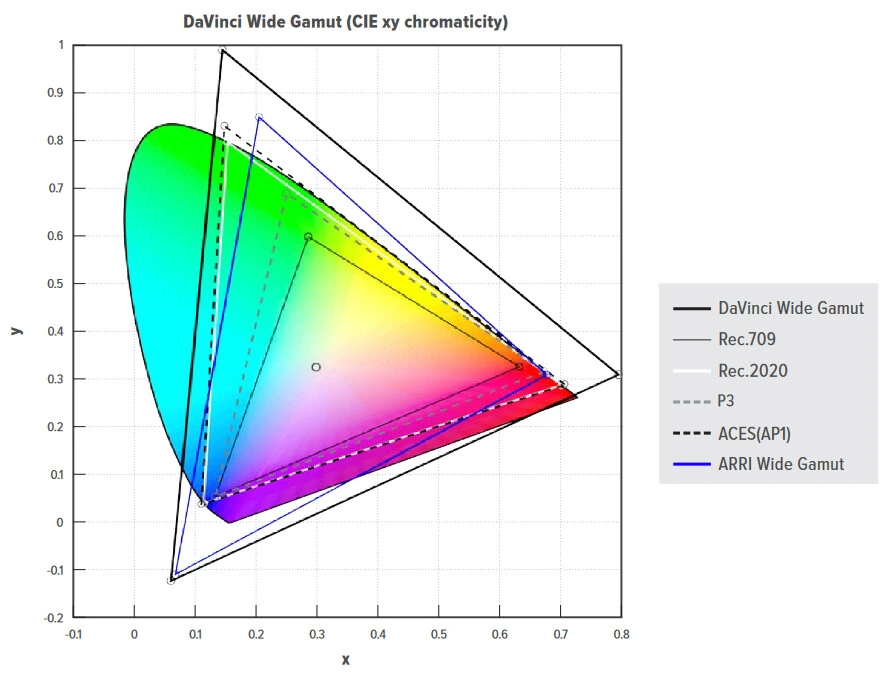
The Practical Verdict:
Activating Color Management in your timeline is no longer optional; it is the definitive first step to ensuring your work remains professional, accurate, and repeatable across all screens.
As a general rule of thumb: If your project involves a heavy multi-platform pipeline moving across external VFX houses and different software, ACES is your safest, industry-standard choice. However, if your entire post-production workflow lives inside DaVinci Resolve and you want rich, organic colors with highly responsive controls and minimal setup time, DWG is undoubtedly your most powerful option.
If you want to master high-end color grading, video editing, and color science through practical, hands-on training, explore our professional live and recorded courses at AskMonther.
Let us know in the comments: Have you started using Color Management in your projects, or are you still struggling with color shifts after exporting?